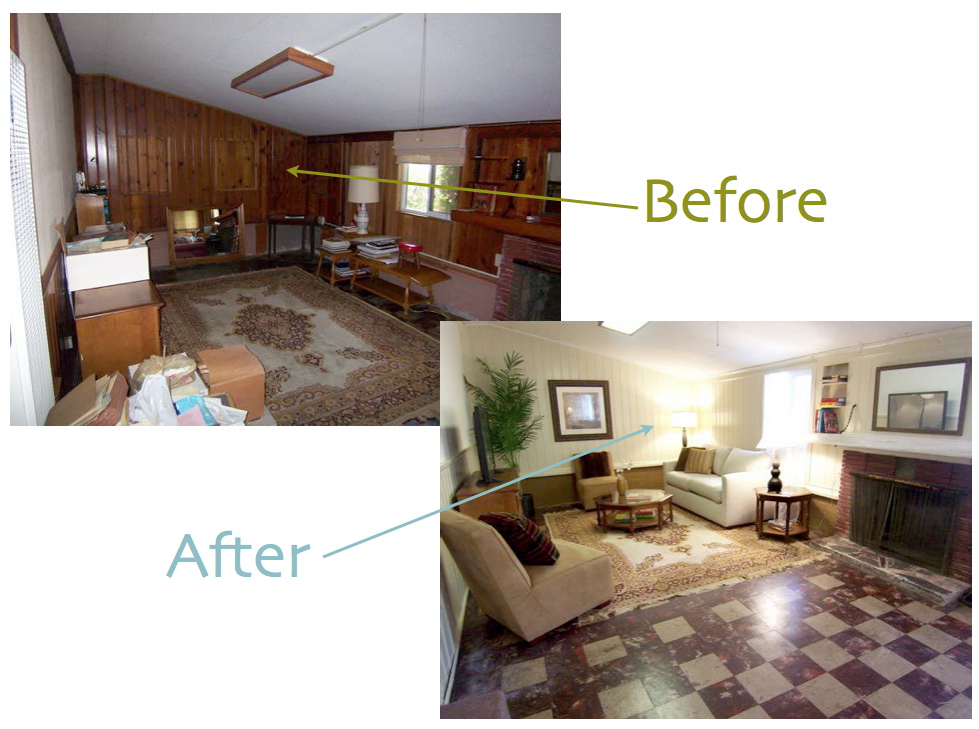
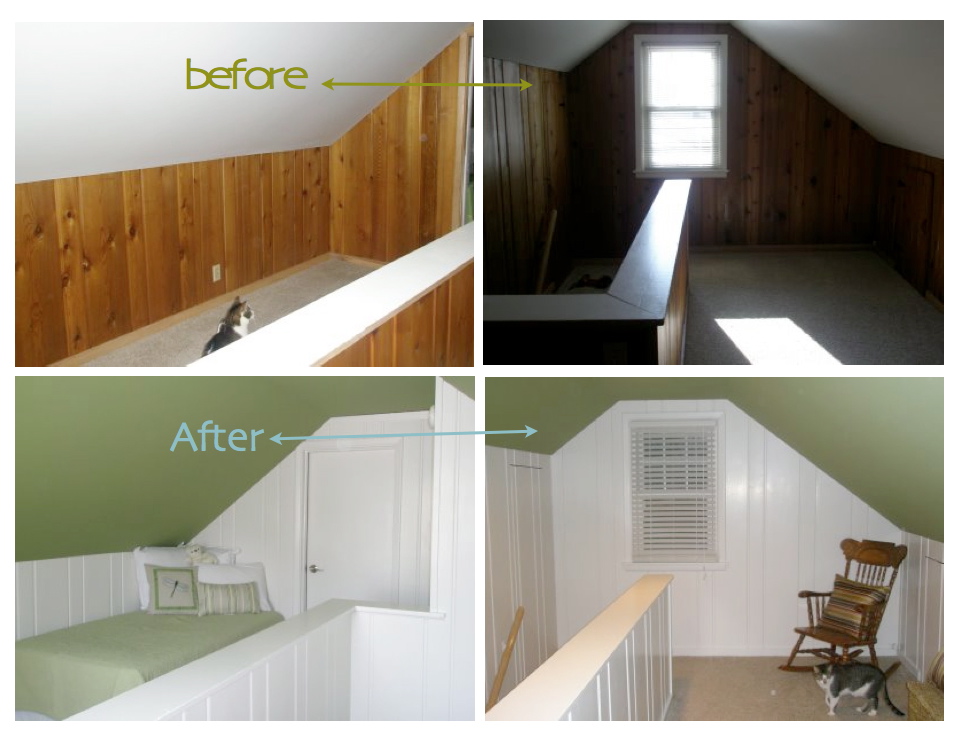
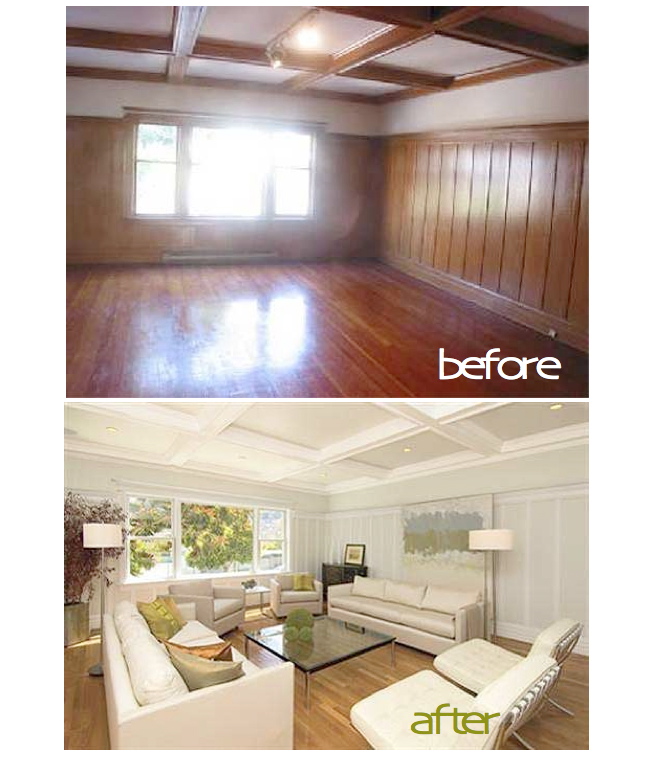
painted wood paneling, before/after B. B.
Step #2: Clean. Grease, grime, and even cleaning-product residue can really build up on veneer or hardwood paneling over the years, which can then prevent your paint from properly adhering to the surface. Be sure to remove all contaminants and residue with a grease-removing cleaner before beginning work. If the paneling is still too glossy.

Unique Painted Wood Paneling before and after Pictures • The Ignite
How to Paint Veneer, Wood, or Faux Paneling like a pro. With the right prep work, you can transform your old paneling and achieve a beautiful new look.Whethe.
painted wood paneling, before/after B. B.
STEP 4: Apply two thin coats of stain-blocking primer. Having finished scuffing the full width and height of the wood paneling to be painted, give the surface its initial coat of primer to prevent.
painted wood paneling, before/after B. B.
How to Paint Wood Paneling. Sand and Patch Holes. Clean the Walls. Apply a Shellac Based Primer. Caulk any Gaps. Apply Two Coats of Paint. Painted Wood Paneling Before and After. This post is sponsored by HANDy Paint Products and contains affiliate links for your convenience.

paint wood paneling before and after pictures Painted Paneling B
Step 2: Wash Paneling. Thoroughly clean the paneling with an all-purpose cleaner or degreaser and a sponge. Make sure to clean thoroughly; any grease or grime left on the wall may bleed through the primer and paint. Allow the paneling to fully dry. Wade Works Creative.

Tips for Painting Paneling Painting wood paneling, Painted paneling
Here are five ideas on how to transform your outdated wood-paneled walls into a stunning design element. Keep in mind: Price and stock could change after publish date, and we may make money from these affiliate links. 1 / 6. Photo: Andre Bernard. Design: Sullivan Design Studio.

March After Party! Paneling makeover, Painting wood paneling, Wood
Steps. With 220-grit sandpaper on a sanding block, roughen the surface of the paneling. Be sure to lightly scuff the profile of any moldings. Pour a bit of primer into a paint tray or cut bucket. Dip the brush into the primer and cut in, starting at the top and working downward. Brush primer into the cracks and crevices of the moldings.

Before and after painting wood panel Home remodeling, Painting wood
When painting wood stained paneling walls there is some things you must know before starting. Like what you need to do to prep the walls to keep the stain fr.

Living Room Before and After. Paneling painted, updated.
Fill and Sand the Wood. Apply wood putty with a putty knife to fill any holes or cracks and allow to dry. If desired, lightly sand all of the paneling, along with trim and moldings, with 150-grit sandpaper. The idea is to take off the sheen and create a lightly gritty surface so the paint will adhere.

Painting Knotty Pine Paneling Before And After Warehouse of Ideas
1. Painting Paneling Before And After; 2. Pro Tips For Painting Wood Paneling (or Wainscoting) 3. We Painted Over 1980s Paneling. 3.1 Wood Paneling Makeovers To Inspire Your Own Redo; 4. Wood Paneling Is Back: How To Incorporate The Retro Look In Your Home. 4.1 How To Make Wall Panelling Look Beautiful; 4.2 Before & After: Painted Wood Paneling.

Panel, Panel, on the Wall.... Paneling makeover, Wood paneling
Step 2. Prime the Wood Paneling. Wood paneling slats primed with a brush. Use a paint brush to apply primer to gaps first. then roll the wall. We used a paint brush to prime the vertical slats first as well as along the ceiling and floor. We chose a No V.O.C. primer from Home Hardware (a Canadian hardware store).

Before and After Gray and Yellow Family Room Painted paneling walls
Use a putty knife to best spread the compound over the holes or imperfections. Don't worry about the color of the putty—it will dry neutral and be covered with paint. Allow the putty to dry, then sand the spackling flush with the surface. Wipe away any dust with a tack cloth. 04 of 09.

painted wood paneling, before/after B. B.
Fill a bucket with warm water and dish soap and wipe the paneling with a damp sponge. Rinse the soap off with a clean, wet sponge. If any dirt doesn't come off, try a heavy-duty degreaser. After cleaning, dry the paneling with a soft microfiber towel or let it air dry completely. 3.

Painting Paneling Ideas Before And After Photos
A coat of white paint keeps the wooden walls from feeling overbearing, and black paint instantly made the dated wood cabinets feel moody and modern. "Don't listen to people that say that painting your cabinets black will make your kitchen too dark," Krista says. In fact, paired with the white walls and new white countertops, the new.

The 25+ best Painted paneling walls ideas on Pinterest Painting wood
Wood Paneling: Before-and-After Makeovers. By: Morgan Faulkner. July 16, 2019. Nothing dates a home like lackluster wood paneling. We've rounded up some of our favorite transformations that take these spaces from outdated to elevated. Keep in mind: Price and stock could change after publish date, and we may make money from these affiliate links.

These Before And After Home Makeovers Will Instantly Inspire Your DIY
Use a damp cloth to wipe down the area to clear it of any dirt, dust, and debris. If you run into any stains or blemishes, lightly clean it with mild dish soap. Cleaning the wall gives you a sleek surface for priming and painting, as speckles of debris can become visible once painted, leaving you with bumpy walls. CREATIVE WONDER / Shutterstock.
